Showing posts with label mortise and tenon. Show all posts

Monday, October 3, 2016

The Lid, Part Two: Breadboard Ends

I cut the top to length after glue up is done. There will be two 2 1/4" wide breadboard ends, each with three 1 1/2" deep mortises and a continuous 3/4" deep groove. They will overhang the sides 3/4", so I cut the top to the outside length of the front.


Now I lay out the pieces for the breadboard ends. I am making them a bit thick and will plane them even after the breadboard ends are glued on.


There will be three mortises in each end as well as a groove.


I mark the start and end points for mortising,


then transfer the marks to the top.


I check the set up one last time and I make the mortises.


I then run the groove using the dado head on the table saw. I set it up so I would make two passes, one each side. That will give me a perfectly centered groove that lines up with the mortises.


As I push the piece through the saw I can feel the resistance lessen as the dado head enters each mortise.  It is rewarding to also hear that the dado head is not cutting anything when it passes through the mortise. My set up is right on.


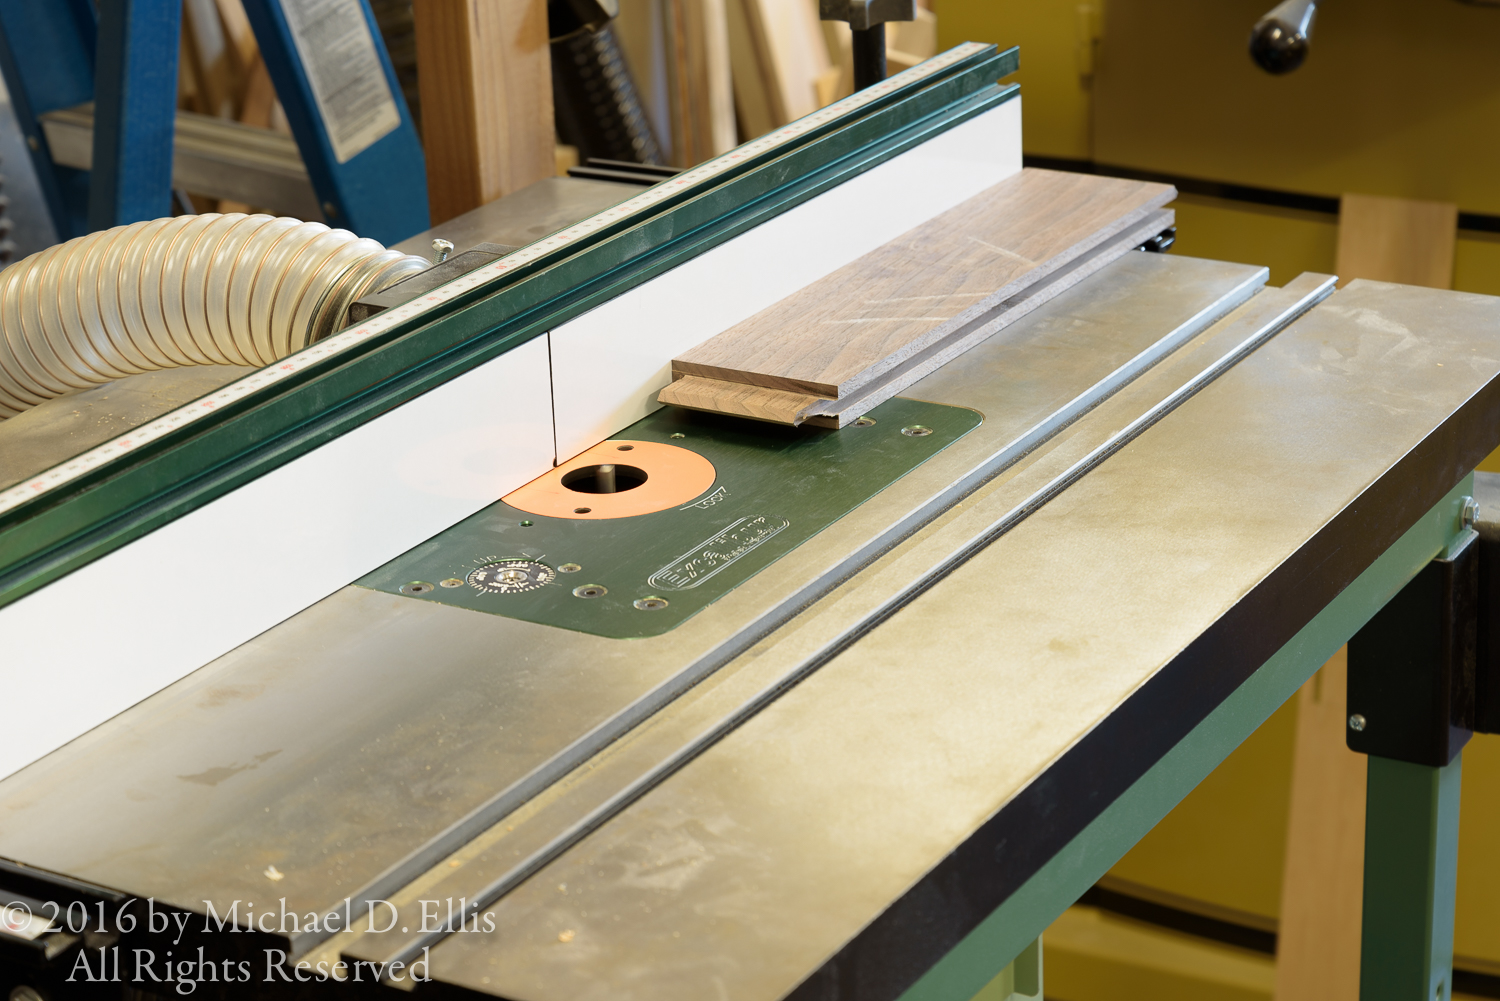
Now I set up the router table to cut the tenons for the breadboard ends. I put the largest rabbet bit I have (3/4") in the collet.


It will take three passes each side to cut the tenons and tongue this way but I don't want to use the dado head or run something this large through the table saw on end. I make a few test cuts with the offcuts of the top and then I have at it.


I am using a backer block to keep the back side from blowing out when the bit comes through. It's on top of the board in the photo below as I need that hand when I start the cut. This isn't as awkward as it looks. While more table in front would be nice, the table is wide enough to register on.


With tenon length cut I mark the locations of the rip cuts from the mortises in the breadboard ends. I used a jig saw to make these cuts. The scrap piece keeps the baseplate of the jigsaw off the work.


The crosscuts are also made with the jigsaw, except for the ends. I cut them a bit long and I'll trim them with a chisel after I get the tenons fit.


I must have let the top drift a little on one side when I was routing the tenons. I should have used a featherboard somehow to hold it down.


It's not much, about a 32nd of an inch, in the middle. I'll use my shoulder plane to fix that.


The tenons are too tight so again with the shoulder plane.


And after some more fussing around the breadboard ends are fitted and ready to glue.


I'll get this glued up but I want to get the top surfaced for finish first. Then I can plane the BB ends down to the level of the top and not have to try to work up to crossgrain. When your tool is sharp it is a delight to use hand planes.


Thanks for taking a look. There's more to come so check back soon!


Wednesday, September 28, 2016

It's Fitting...

Now it is time to start putting it all together. First I mitered the ends of the rail tenons. I used the mitre gauge that came with the table saw to guide the work piece. I placed a stop block on the fence to set the first cut. Since I was making each tenon about a 16th inch shorter as well as mitering it, for cutting the other end, I used a shim about the thickness of the saw kerf instead of re-setting the stop block.


Next I have to fit each joint. I try to cut joinery so everything fits without too much fussing around but when I want each joint to be as good as I can make it, I tend to leave some hand work to do.


There is usually a little bit to remove at the intersection of the cheek and shoulder cuts. I hold the piece in the vise and use a chisel to clean this up.


I work each tenon, and finish by chamfering the ends to allow easy entry into the mortise when gluing up.


Next I check the fit against the mortise. I use my shooting board as a bench hook to hold the work and my shoulder plane to bring the tenons to a perfect fit. I want to be able to hand insert (and hand remove) the pieces. I also keep in mind the complexity of the glue up. As I fit these parts I realized that this glue up will be pretty intense, so I have tried to compensate and made some parts a bit easier to bring home than if I was gluing a piece with fewer parts.


I had a bit of trouble at first planing the short tenons on the stiles. I found I had to be very careful not to plane unevenly across the tenon. A few ended up twisted slightly, maybe out by a 64th inch or so. That won't work for me so, while I had the frame assembled I used some tape to mark the sides that needed help. I made a thin rip on the table saw and rebuilt the thin part. I made a good guess on thickness so they didn't need any further planing and the twist was gone.


So it is starting to look like something more than a nice stack of wood now.


Finally, I set up the router table with a 3/8" straight cutter and made a groove in the bottom rails to hold the floor. 


Lower rails with groove for floor


Well, I have a bit more work to do now to get the frame parts all assembled so I better get to it.... (time passes)  Well, now I have the frame parts fitted and it is looking pretty nice! 


I still need to do some surface prep before I glue up the frame, and make the floor before I can do final assembly. Check back again and see how it's going. Thanks for taking a look.

Monday, September 19, 2016

Joinery For The Rails

Now I set up to cut the mortises, grooves, and tenons on the rails. The drawing below shows typical joints for the rails.


The drawing below shows the corner post joinery in plan and elevation, including the groove for the floor. 


I don't need a complete drawing, just enough to be able to understand all the details and transfer the information from the drawing to the workpiece. The construction is the same for all four sides. Only the lengths change. 

I set my marking gauge to the tenon length (1 1/8"). I try to be very precise when I do this and usually have a couple of stabs at it before I am satisfied. I use a ruler with machined markings (to 64th's of an inch) and set the cutter into the proper groove on the ruler. Then I make a test mark and measure it to be sure it is correct.   


I have to use reading glasses and a 10x loupe on occasion to see closely nowadays.


I decided to make a story pole for the rails for this job. A story pole helps cut down on measuring errors and, if I ever make this project again I have the layouts all ready to go! Here, the story poles are laid on top of the workpieces. It is often difficult to see the markings on the small version of the photos. Click on any photo to see it larger.


Here I am using a square to even the ends of the story pole and the workpiece up before transferring the marks. I then use a square to mark across the edge.


I used the story pole to mark out the mortise locations and the locations of the edges of the stiles. I then set up the mortise machine and cut the mortises. Then I set up the table saw for cutting the tenons. I am using a General tenon sled. Once it is set up it works well but it is a bit difficult to adjust. 

After cutting the cheeks I changed blades and set up the crosscut sled to cut the shoulders.


Here are the tenons all cut.


Next I had to re set the height of the slot cutter. I turned the plywood fence piece over and made another cut after re setting the height. I then cut all the grooves. 


After the grooves are completed


Now I'll make the tenons and grooves for the stiles and start fitting parts. I hope you check back and see how it's going.


Wednesday, September 14, 2016

Mortising The Legs

The first thing I want to do when I set up the mortiser (after setting the drill bit projection) is to make the chisel square to the fence. I used a scrap piece of wood for this. I set my marking gauge to 3/8" and scribed a parallel line along one side.  I then adjusted the bit to cut parallel to my line. I then made a series of tests to set the fence. The cuts on the left are the tests.


I set the gauge to 3/8" because, from the face of the leg, I want a 1/8" reveal, and a 1/4" shoulder on the tenon. You can see below that I am a little (about 1/128" I would guess) off the line. This is really close enough. The ruler is marked in 64th's of an inch.


After all that I still want to use a test piece when I set up the machines. I made a piece of scrap maple to the same dimensions as the leg stock. It is a little short but I will be able to test all my cuts before machining the actual leg material.

This mortise machine has a riser block installed at the base of the column to allow for mortising wide/tall material. This makes it too tall to mortise 1 1/2" material so I use a scrap piece screwed to the fence for a riser making it unnecessary to change the riser block at the column.


The test looks great so on to the legs.


Legs all mortised. I have bandsawn the curve on my maple test piece also.


Next, I'll finish the leg work and start on the rails. Thanks for taking a look. Check back and see how it's going. 


Monday, September 12, 2016

Blanket Chest Joinery

With the walnut lumber having sat now for almost a month since being cut open, I can bring this material to dimension. I had to flatten everything again and then plane to thickness. I used the table saw to rip to width, and a cut off sled to make the crosscuts. Now I need to get ready to cut the joinery.

For the legs I need to cut mortises with grooves between, as well as the "foot" detail. Here is my shop drawing of a leg as well as a plan view detail and an elevation detail of the bottom rail joinery.


A few details may change as I am still thinking through where the floor seats in a groove in the bottom rails. I want to also seat the floor into the legs and am also thinking of rabbeting the inside of the leg flush with the inside of the rails. Mainly I am thinking about whether this will remove too much material and compromise strength and stability. 

I recently purchased a set of slot cutters for the router and am planning on using them to cut the tongues and grooves for this project. This set (from Lee Valley tools) includes a variety of shims to adjust the width of the tongue or groove. It includes a pretty comprehensive set of instructions.


I started checking dimensions for the cutters I wanted to use and found my 1/4" hollow chisel mortise bit is slightly larger  (about 15/1000s) than 1/4". The slot cutter can make that dimension for a tongue and a groove but I will need to do some test cut first.


I am using a new bit for my mortise machine and as you can see, the drill bit shank is too long and needs to be "docked".


I want to do a neat job so I make a holder of hardwood by drilling a hole the size of the bit shank in a block and sawing it in half. I can then put the bit in the hollows and clamp the block. This gives me something I can clamp in a vise or hold on to while I hacksaw the bit to length.


I have a few different sized holes in this block. I also have a block sized for a 1/2 inch bit. I run the hacksaw against the side of the block and use a file after to smooth the cut.


Now I can make a test mortise and size the winged cutters for a test groove.


I am pleased with the results using the mortise machine and the winged cutters. I was able to size the groove to fit the mortise and, in two tries, line the mortise up with the groove cutters.


Next time, more joinery details.