Showing posts with label blanket chest. Show all posts

Tuesday, November 8, 2016

Final Assembly, Finally!

Glue up is relatively easy at this point. I first glued up the front panels and legs.


After the glue had set on the front, My friend Richard dropped by. He had offered to help me with the glue up and I had accepted his generous offer. We set to work applying glue and putting parts together. First one of the side panels, then the floor (no glue here), then the other side and finally the back piece. This all went smoothly except for my forgetting that the legs were not yet glued to the back piece and we had to take that assembly off, glue up the legs to the back, and then re set the assembly. Luckily we noticed this before we had brought any of the parts completely home. I was also using glue with a 20 minute open time.


The other complication I had anticipated and had 4 screw clamps that I had notched a jaw of so I could bring the side stiles tight to the legs if needed.


It was and I did. After the glue set and I had removed the clamps I could plane the ends of the legs flush to the rails. I had left these a hair long.


My low angle block plane worked really well to flush that end grain down.


I skewed the plane to the work and carefully sliced until I had the tops nicely flush.
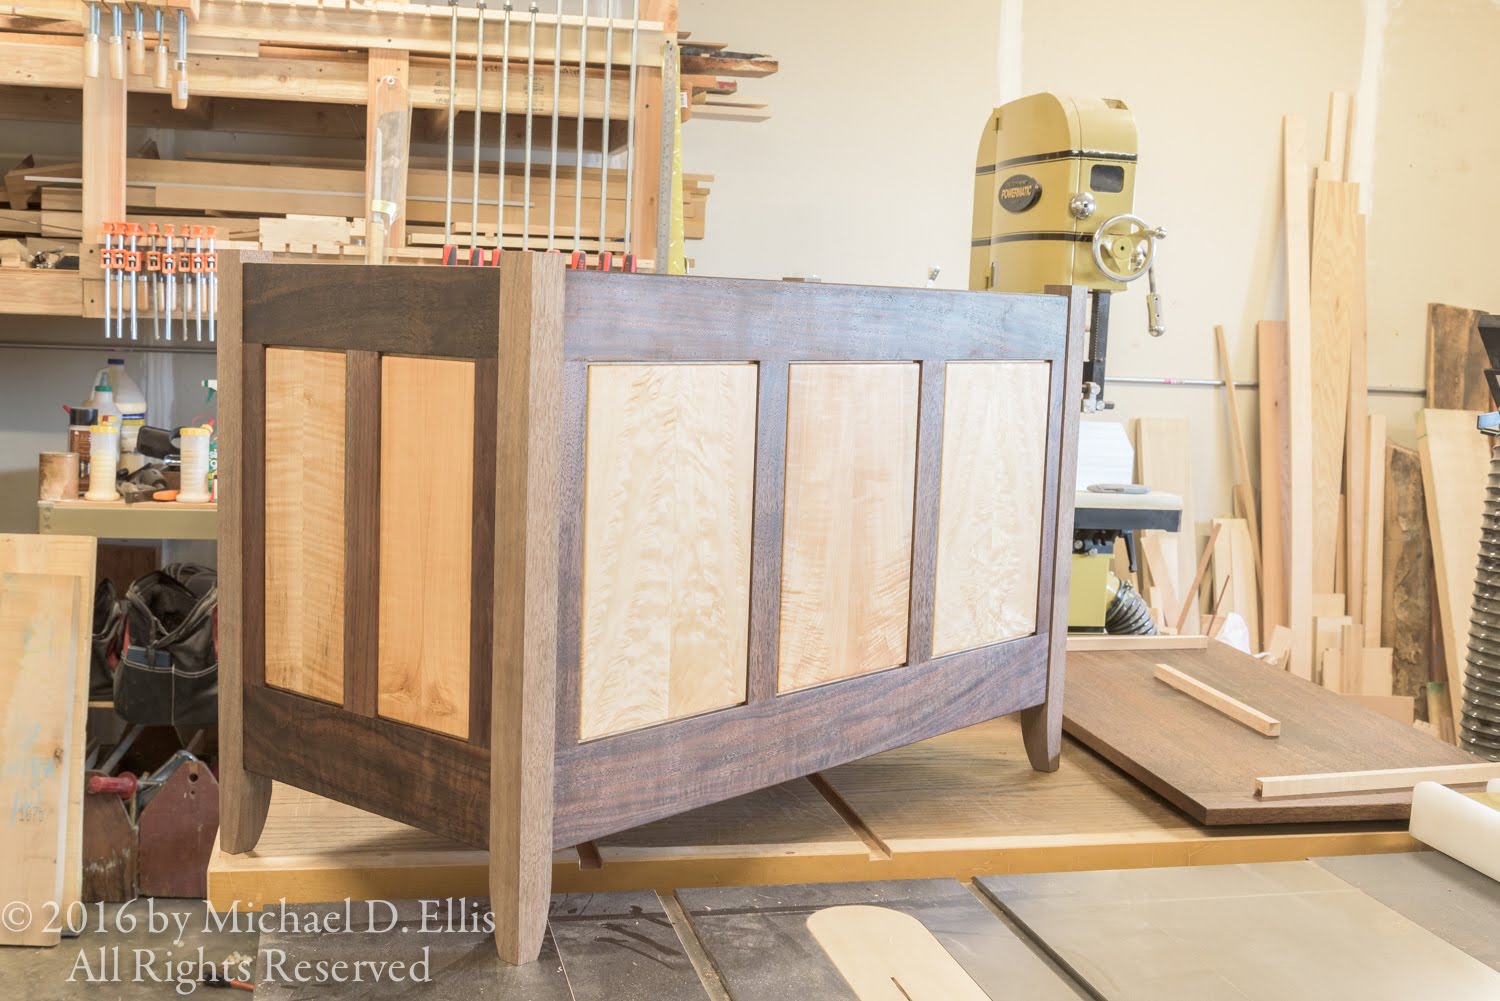

It looks good!


Next I mortised for the hinges using the template I had made previously and applied 2 coats of wax to the lid and outside of the chest. With that done I re-attached the hardware and stood back to take a look. All in all I am pleased with the way this piece came out. The contrast between the maple and walnut works well and the book matched panels look really nice.


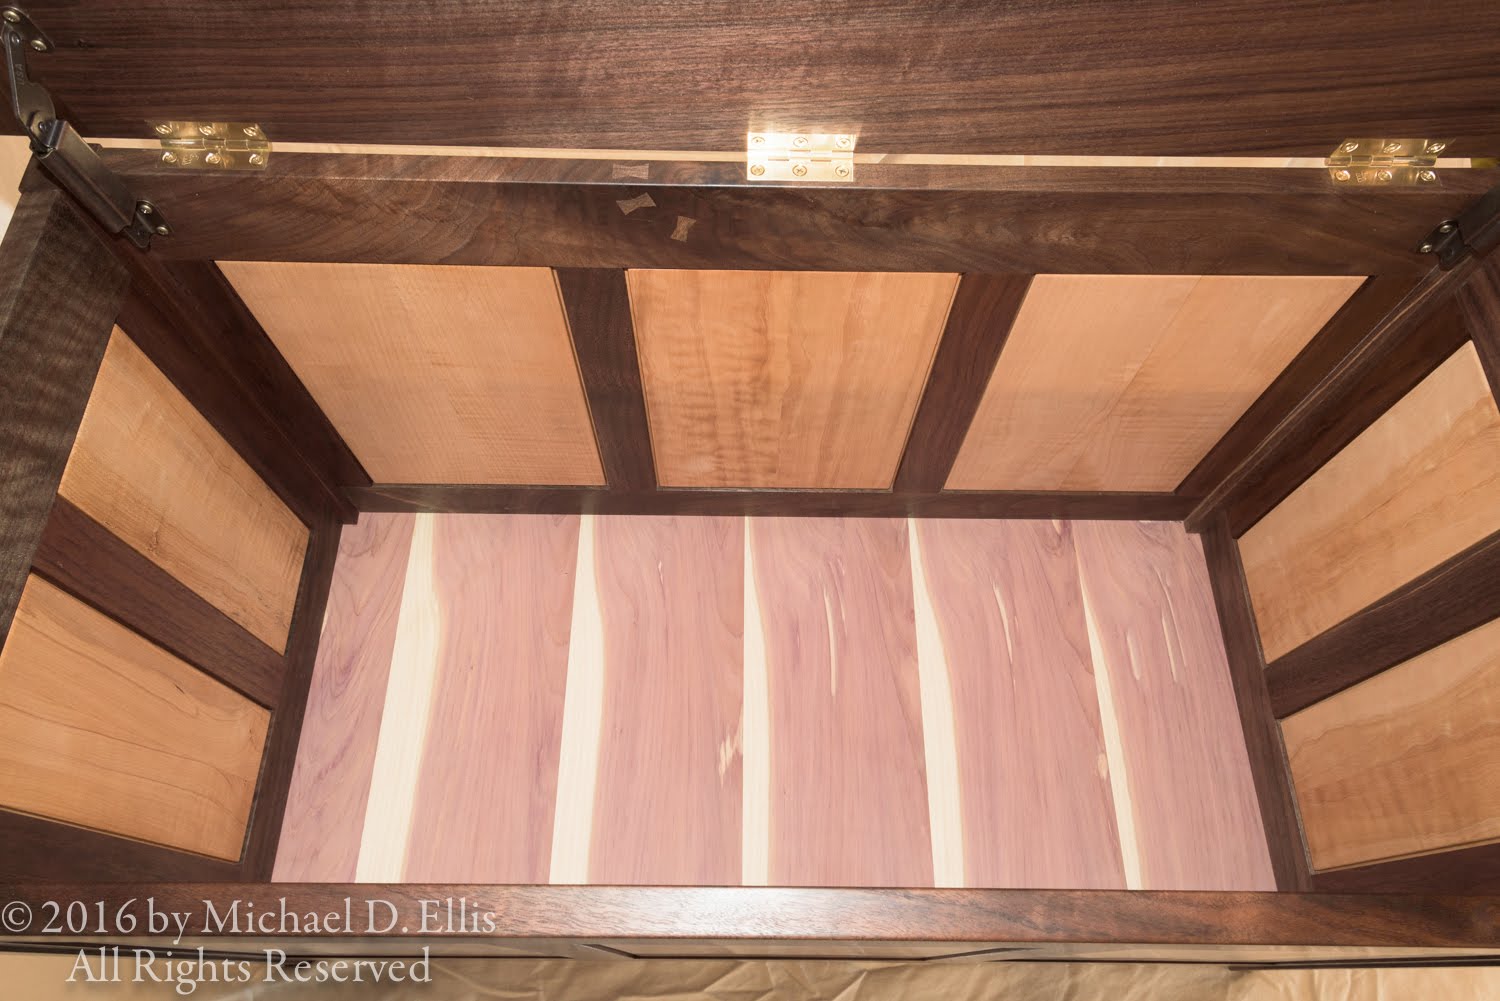
Here is a look at the inside.


And a look at the hardware.


Thanks for taking a look. I hope you have enjoyed seeing how I made this piece. Check back again and see what I am up to next.


Thursday, November 3, 2016

Getting Ready For Final Assembly

I still have a few things to take care of before I can assemble the chest. I need to detail the edge at the bottom of the leg to protect it if the finished piece is ever dragged around. I also want to apply wax to at least the interior surfaces. Since I am leaving the floor unfinished I don't want to have to apply oil or wax to the surrounding surfaces. I will have a bit of detailing to do after assembly at the top edges of the legs.

For the edge detail I scribed a line about 3/32" around the sides of the leg as well as the bottom.


I then used my block plane to bevel the corners.


The finished chamfer.


I taped the inside areas of the legs where I didn't want oil and set to work applying two coats, with 24 hours between.


I also got to work applying wax to the inside surfaces of the already oiled parts.


The wax adds just a touch more gloss than oil alone. The bottom piece has been waxed.


Here are all the parts waiting for the last applications of finish.


One of the last things I do is to inlay a piece with my initials and the year of construction into the bottom of the floor. I made a template by taping the paper pattern to a piece of plastic film, (actually the peel off backing from a piece of 3M lapping film), and cutting out the letters and numbers with a razor knife. I then could put the template on the workpiece and pencil in the outlines. Then I practiced, experimented, got frustrated multiple times, called up distant memories of carving episodes of "The Woodwright's Shop", and eventually made one piece I was somewhat happy with.


As I practice carving more I expect that I will be confident enough to carve an actual part, but not today! I then made a template to guide the router to excavate the mortise.


The blue tape is shimming the guide to a tight sideways fit. I made the side cuts in the template too big initially. Here is the piece set into the bottom.


Now it is ready for final glue up.

Tuesday, November 1, 2016

Finishing The Floor

Now, back to putting the piece together, I still have to notch the floor corners and run a rabbet around the bottom face to fit into the groove in the bottom rails and legs. I laid this out on the floor itself and checked my measurements and calculations several times before going any farther.


I used the router to make the rabbet. Here I am setting the depth.


I could use the router fence for the long edges.


After that was done I cut the corners out with a jig saw.


I then made the rabbet for the inside corners. I made a simple guide so I would get a neat rabbet.


After making the rabbet I used my block plane to round over the edges of the rabbet. I know this will not be visible without turning the piece over but I want the work to look "neat" everywhere. With the floor now ready I make a test fit with all the parts.

The inside


The bottom


View of the bottom inside corner


And the first time all the parts are assembled together


With everything fitting well, I disassemble one last time and prepare for glue up.

Thanks for taking a look. I hope you check back again and see how it's going.

Tuesday, October 25, 2016

It's Coming Together

Well, the chest is almost ready for assembly. Now there seem to be a million little things to take care of. I dry fit the panels to the legs so that I could mark the location of the dado for the floor on the legs.


Here is a closer view of the groove and post intersection.


After marking those locations I then took the chest apart and began applying varnish oil to the frame and top. This is when you really start to see the richness of the grain come out. This is also when you find all the places where your finish prep is not sufficient. I did a pretty good job on this project and didn't have to stop applying oil to clean up anywhere.


I carried the marks I made on the legs around with the marking knife and saddle square. 


I decided I should make a router guide to dado the legs. I used some scrap plywood and maple to make the guide and fence. I glued the fence to the guide and added screws after the glue had set.


With the guide ready I grabbed the test leg yet again and tried the guide and router setup. It looks good.


I use my marking knife to align the cut in the guide with the knife marks on the leg. When it is aligned I tighten the vice and check again before making the cut.


All four legs are done and I am happy with the outcome.


Now I can plane any machine and layout marks from the legs prior to assembly of the case.


I do enjoy planing but these legs only needed about three passes per side.


Well, that's all for now. I'll be laying out and rabbeting the floor next, then assembly and hardware.

Thursday, October 20, 2016

Breadboard Ends, Dowel Plates, And Drawboring

I'm back to the blanket chest now. I have been readying the frames for finish and leveling the floor among other things. Today I am attaching the breadboard ends to the top. Due to concerns about wood movement (the 18" wide top could expand almost 1/4") I decided to drawbore the breadboard ends to the top.

I first made some dowel blanks on the table saw.


I then used my spokeshave to make them approximately round and a bit oversize. Finding a good way to hold the piece was a little tough. I ended up putting them nearly vertical in the vise. A shaving horse would be nice for this.


I used a Lie Neilsen dowel plate to form the dowels from the blanks.


I found that one has to be careful to leave a bit of material on the blank to be removed by the dowel plate. It helped to start an end to give me a visual to work to.


If your blank is undersized you will not have a round dowel. Once the blank is ready you then hammer it through the appropriate hole in the dowel plate.


I made a test hole with the bit I planned to use and checked the fit of the dowel.


I marked out the hole locations on the BB ends and made the holes on the drill press.


With the ends tightly on the top I used the bit to mark the hole centers, removed the BB ends, and set the hole centers about 1/32" closer to the shoulder to draw the ends tight.


After drilling the holes in the tenons I widened the two outer holes to accommodate any expansion or contraction.


I then applied glue to just the center mortise and tenon. I also glued the dowels and drove them into their holes. After the glue set I sawed the dowels flush. Now I can plane the BB ends flush and size the panel (it's still a bit wide).


Thanks for taking a look. The chest is moving towards final assembly. I hope you check back again and see how it's going.

Tuesday, October 11, 2016

Veneering The Floor

Here I am laying up the veneer into oversize sheets. The veneer is thick enough that I can glue the edges. I am using veneer tape on the show face to hold the pieces together while the glue sets. I'll scrape it off after I have glued the veneer to the substrate.


Once the glue set I scraped the excess off the back.


I am using a workbench and an assortment of scrap to make a setup to glue the panels.


Here I am testing the clamps etc. Paper is the first layer over the veneer in case any glue escapes, Then I am using a piece of a wood core door. Over that I have four thick blocks which I can clamp from both ends. It's a bit of a jumble but it works.


I tried the bottom piece first to see how it goes. Well, as I sometimes say "live and learn". That is to say that it did not go as well as I wanted. I put a good layer of glue on both surfaces, which made the veneer warp.


That isn't a big problem but when I picked the piece up to transfer it to the substrate, it split in two places. With everything covered with glue I decided to move ahead and not repair the splits first. Everything wanted to slide around. I used a couple of 1/2" brads to hold the veneer in place for clamping and fit the splits together as best I could.


I left the work in clamps overnight. I had removed them after 2 hours but found that the glue still had not set along one of the splits so clamped up again. I removed the clamps with some apprehension and was pleased to see that I had a panel that was usable. I may rout out and replace a section where one of the splits had pulled away a bit leaving a gap, but it is a usable face for the bottom.


Applying what I had just learned to the glue up for the show face, I spread a generous amount of glue on the substrate only,


then carefully moved the veneer into position. I tacked one end down and used my hands to press from the middle a bit, then added the door and blocks and clamped it up.


I left it clamped for about 24 hours. this time when I removed the clamps all had gone well. Since I made the veneer oversize I have to use a spacer against the saw fence for the first cut.


Then I can trim the other edge against the fence. I use a crosscut sled to trim the ends.


Well, thats all for now. Thanks for taking a look. Check back again and see how it's going.