Friday, July 29, 2016

A Trip To Goby Walnut In Portland Oregon


I went to Goby Walnut Products today to pick out material for the blanket chest. I had looked on their website and thought they would have what I needed. They log street trees and have a nice selection of walnut and big leaf maple as well as other species like locust and sycamore.Here is their showroom/warehouse where you will find a lot of nice figured lumber.


Here is the figured lumber shorts section.


I spent about an hour or so looking around and picking out material for panels. Most of their stock in front is milled 2 inches or so thick. Great for resawing into parts. Cyndi, the inside sales manager, helped me with pricing, location of stock etc. and was very friendly and helpful. Next I went looking for walnut stock for the frame parts. The dimension stock is located in the warehouse section.


After a while I had what I thought I needed so loaded up a cart and went to check out. Cyndi tallied everything up and I settled the bill.


I found Goby Walnut Products to be a good source for some nice lumber and enjoyed shopping there. They have a pretty large selection available and I am sure that I will be returning when I am looking for figured walnut or maple. Now I will begin the milling process and start to make a blanket chest from the lumber I just purchased. Check back and see how it's going.

Thursday, July 28, 2016

A blanket chest

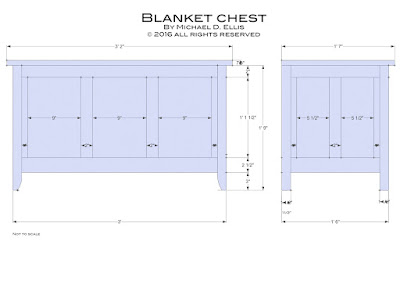
Here is the basic design for a blanket chest I will be building soon. The lid will be hinged and supported so it can't fall on any small heads and there will be a till inside. These drawings don't show any joinery or edge details but are enough to figure lumber needs etc. from. I'll make detail drawings for joinery as needed and some details will be worked out while building. I want the frame to be walnut and the panels figured, bookmatched maple. I am going to try a new lumber supplier and will let you know how it goes.

Monday, July 25, 2016

Dust Collection Changeover Complete

Well, after several trips to two suppliers I have moved the dust collector and gotten all the machines hooked up.


I used flex hose and still need to pick up a few more clamps. Other than that I am back in operation. As you can see, I was able to route the hose above the ceiling to pick up the planer and table saw. 


Here is the dust collector unit tucked into it's little house.


And this view shows the fittings a little closer up.


The back wall of the shop is a work in progress. I would like a work bench where the dust collector was and I am going to extend the upper level of the lumber rack to the corner but for now I have a few projects to catch up on so that will have to wait. 

What projects you ask? well, you'll have to check back and see!

Thanks for taking a look and I hope you will come again.

Monday, July 18, 2016

Installing Dust Collection

When I first set up my shop I knew I wanted to put the dust collector outside the shop. I first had to pour a pad, frame the walls, install siding, build some doors etc. Needless to say a lot of other things also needed doing and I ended up with the dust collector in a "temporary" location for several years. Now I am ready to make the move and am really looking forward to gaining more space as well as finally getting all those hoses off the floor.


I will have two hoses penetrating the back wall. One at ceiling height to pick up the planer and table saw, and one at about 4' ABFF to run along the walls and pick up the router table, band saw and jointer.

With the installation of the doors the space for the dust collector is now closed off. I will move the dust collector to it's new location and lay out for the wall penetrations. I need to get a few more hose fittings and then I can put it all together. 

The doors installed

View of the back of the shop showing the attached dust collection shed


Tuesday, July 12, 2016

Mailboxes and Accuracy


The above photo shows a pair of mailboxes I made while working at Portland State University. I made quite a few mailboxes over the years and found them to be a very interesting category of cabinetmaking. When I was first assigned to build a mailbox unit I began to realize what a challenge it would be to produce. These units are made up of 5 verticals dadoed for 15 shelves plus the top and bottom pieces making 60 mail boxes and 2 large shelves. The center verticals are dadoed on both sides. I had to come up with a way to make each dado in the same place from piece to piece. Even a variation of 1/64" over 15 cuts adds up to a half inch difference. The accuracy and precision required were a little daunting to me initially.

I have used a dado set on the table saw with a crosscut sled or sliding table and thought I could use a box jig type setup to register the cuts but it seemed like it could be a bit sloppy and I was concerned that the shelves would not line up. My other option was a router. I sure didn't want to have to set a straight edge for each cut. That would have been worse than using the table saw. So I designed a base for the router that would register off the previous cut and thus maintain a set distance between each dado.

I used a sheet of clear acrylic for the base and added a runner to the bottom (like a miter slot runner), sized to fit the groove produced by the router bit I was using (1/2"). I made the distance between the runner and the bit the distance I wanted between dados. I attached the router firmly to the base and was ready for a test cut. After adjusting the runner to produce the distance between dados I wanted, and adjusting the bit depth I was ready to make some dados.

My first cut had to be done using a straight edge for a guide. After that I could use the jig I had made to run the rest of the grooves. I had previously spent a fair amount of time calculating and laying out the shelves so I could determine the overall dimensions. I actually left the sides long and cut the miters at the top after making all the dados. I also left pieces together when possible, like the two sides, and ripped them apart after dadoing in an attempt to further maintain accuracy. This worked pretty well and I was able to produce a piece both myself and the customer were happy with.

After a while our shop purchased a panel router. With this tool I could make a jig that would register and position my workpiece for each dado. This greatly simplified the machining of all those dados. I could now make identical pieces with relative ease.


Assembling something like this takes some thought. I ended up making a frame to assemble against to hold everything straight and square. With all those dados the pieces were kind of floppy, especially the middle ones! It takes a fair amount of time to glue in all those parts. After all the pieces were glued in I then had to cover the plywood and melamine edges with wood. 


The edge banding was glued and clamped with tape. I cut the edging with a chop saw and then planed it to fit using a shooting board.


After the glue is set the tape is removed and the surfaces are leveled and prepped for finishing. Finally, the whole thing is rolled over and a back is glued and nailed on. This makes a very heavy unit with almost a sheet of 3/4" hardwood plywood and about a sheet of 1/2" melamine per unit!

Friday, July 1, 2016

The Veritas MKII Honing Guide and Sharpening Edge Tools by Hand

I have found a honing guide to be invaluable when sharpening my edge tools. I do sharpen my striking knife, skew chisels, and small narrow chisels by hand since they don't fit in my guide. After a fair amount of looking around and using various sharpening jigs I finally settled on the Veritas Mk II Honing Guide, available from Lee Valley Tools


There is also an attachment you can buy to use with skew chisels but I don't have that. This honing guide allows me to quickly and repeatedly set my blade or chisel at the correct angle so I can do touch up sharpening while in the middle of a project. This guide also has a feature that, by pulling and turning a knob you can change the blade angle by 1 degree allowing a secondary bevel to be formed. This is handy!


Here the guide is shown with the angle setting attachment on.


This controls the projection of the blade and thus the angle. There is a good instruction booklet that comes with this guide to explain it's use and help decipher the markings.

Here the guide is shown from the under side showing the chisel blade meeting the stop. The fence on the side keeps the blade square to the roller. You then tighten the blade clamp, remove the angle attachment and you are ready to roll.


At this point you just push and pull the device with the blade registered on the abrasive, as below. You need to pay a bit of attention but it is really quick to do 50 strokes back and forth. More than enough to touch up a blade during use. Notice that I have placed the film close to the edges of the glass. This is so I can lap the burr off the back of the blade without removing the tool from the holder.


Unless a blade is really in bad shape I run through the 15, then 5 micron grits. If I want a high polish I will finish with the 0.5 micron. If a blade is chipped or needs the bevel changed I will start with sandpaper as coarse as 400 grit and work up from there. Some folks use a bench grinder for this. If you do, be careful not to overheat the tool!

When I am readying a new chisel or plane blade for use I lap the back to flatten, smooth and polish it. You don't have to do the whole back, just the bottom 1/8th inch or so. After I have the back in good shape I install the chisel or blade in the holder and start honing. If you are buying a decent quality tool it should come with the blade square and reasonably sharp. The back will probably be flat but rough compared to the front of the cutting edge. Start with the grit that seems appropriate. You want to polish out the previous scratch marks and leave progressively smaller ones until, at 4000 grit or so, you have a nice polished edge. Here is a close up of a chisel blade after sharpening. This is a 1/2 inch chisel. The micro bevel doesn't look as polished in this close up as in real life, but it looks pretty good with the naked eye.


I hope you have enjoyed hearing about my sharpening practices. Leave a comment and let me know what you think.

Check in again soon.